

Note: This is an extended transcript. It includes spoken dialogue, meaningful sound cues, and relevant visual information to support people who are deaf, hard of hearing, or using screen readers.
[Visuals: Home page, showing images of mountains, a lake and a river, along with buttons labelled Log in, Register and Welcome video]
Introduction
Narrator (spoken in English):
Welcome to SWAT, the new Smart Weed Alert Tool from DOC!
SWAT alerts you to new weed records in your area.
[Visuals: Infographic showing publishers sending weed records to GBIF (Global Biodiversity Information Facility), which sends the records to SWAT, which sends alerts to users]
SWAT uses weed records that are published to GBIF - the Global Biodiversity Information Facility.
There are over 170 publishers of New Zealand weed records to GBIF.
Publishers include iNaturalist, herbaria, and some regional councils and government agencies.
[Visuals: Page showing the alert type options: 'New or uncommon weeds', 'Category of weed' and 'All weeds or particular species']
SWAT will alert you to:
- new records of new and uncommon weeds in your area;
- or to weeds classified on official weed lists;
- or you can select particular species that you're interested in.
New or uncommon weeds
[Visuals: Dashboard with a Create a new alert button, Active alerts and Inbox]
After registering, you can create a new alert.
[Actions: Click Create a new alert]
[Visuals: Create Alert page is shown]
Selecting New or uncommon weeds will alert you to the first 10 records of each species.
[Actions: Click New or uncommon weeds]
[Visuals: The box is highlighted and the Select button changes to Selected]
Click Next to select places.
[Actions: Click Next]
[Visuals: Places page is shown]
Here, you select the places you are interested in.
You can select All of New Zealand, the North Island, the South Island, or specific places.
[Visuals: The buttons for All of New Zealand, North Island and South Island are shown. Underneath is a text box labelled Search]
Typing a few letters into the search box will find places containing those letters.
[Actions: Type a few letters into Search]
[Visuals: The list of places underneath Search is filtered]
You can optionally filter it with one of the place type buttons.
[Actions: Click on one of the place type buttons underneath Search]
[Visuals: The list of places is further filtered to this place type]
You can also select a buffer distance to include a buffer zone around your place.
[Visuals: The page also shows a map. Underneath the map is a slider labelled Buffer: 50m]
[Actions: Slide the buffer slider to modify the buffer distance]
Click Next for Advanced Settings.
[Actions: Click Next]
[Visuals: Advanced Settings are shown - When to stop alerting me, Maximum location uncertainty, and Exclude particular species]
We recommend skipping the advanced settings on your first alert.
We've set sensible defaults for these values.
Click Next to see the summary.
[Actions: Click Next]
[Visuals: A summary is shown]
The review screen shows a default Alert title and Description.
Edit these so they make sense to you.
They help you recognise this alert on your dashboard.
The screen also summarises your other alert settings.
Select Finish to create your new alert.
[Actions: Click Finish]
[Visuals: Active alerts are shown, including the new alert]
Category of weed
[Visuals: Create Alert page is shown]
The other alert types are fairly similar, with just one extra step.
When selecting Category of weed, you need to specify the categories to include.
[Actions: Click Category of weed]
[Visuals: The box is highlighted and the Select button changes to Selected]
[Actions: Click Next]
[Visuals: Select weed categories is shown]
This will add all weed species in that category to your alert.
For example, adding the Environmental Weed List will add all 386 species on the list in your alert.
[Actions: Click Environmental Weeds]
[Visuals: The Environmental Weeds box appears]
[Actions: Click Add to alert in the Environmental Weeds box]
[Visuals: Environmental Weeds appears near the bottom of the page]
For Regional Pest Management Plans, you must select the regions and related management programmes to add to your alert.
[Actions: Click Regional Pest Management Plans]
[Visuals: A list of Regional Pest Management Plans appears]
[Actions: Click Christchurch RPMP]
[Visuals: A list of management programmes is shown with an Add to alert button for each one]
[Actions: Click on Add to alert for the Exclusion and Progressive Containment management programmes]
[Visuals: Canterbury RPMP - Exclusion and Canterbury RPMP - Progressive Containment appear next to Environmental Weeds at the bottom of the page]
All weeds or particular species
[Visuals: Create Alert page is shown]
Or you can select All weeds or particular species to define species you're interested in.
[Actions: Click All weeds or particular species]
[Visuals: The box is highlighted and the Select button changes to Selected]
[Actions: Click Next]
[Visuals: Select species is shown with a Select All Species button and a search box]
Here you can select all species, or filter the list by entering part of a species name.
[Actions: Type "scande" into the Search box]
[Visuals: A list of species containing "scande" is shown with an Add to alert button for each one]
Then you can add one or more of the entries to your list.
[Actions: Click Add to alert next to Asparagus scandens and Cobaea scandens]
[Visuals: Asparagus scandens and Cobaea scandens are shown at the bottom of the page]
As an alternative, you can search for species using part of the common name.
[Actions: Type "climbin" into the Search box]
[Visuals: A list of species containing "climbin" in their common name is shown with an Add to alert button for each one]
You can also add a whole genus, or a broader group of related species, to your alert.
[Actions: Type "clemat" into the Search box]
[Visuals: A list of species containing "clemat" is shown, including the Clematis genus]
Alerts
[Visuals: Dashboard]
You can create as many alerts as you like. The SWAT dashboard will show all your active alerts.
SWAT checks daily for new weed records.
[Visuals: Alert email showing a table of weed records]
We'll notify you by email when newly published weed records match your alert settings.
The alert email shows a map of the locations of the weed records.
It shows how many new records of each species have been published.
It also includes the total number of records for your selected location.
And finally, it shows whether the species is classified as a weed under national or regional frameworks.
To view more details, click on View records.
[Actions: Click View records link]
[Visuals: Weed records page is shown]
This opens the weed records page with an interactive map.
Hovering over a weed record shows the location of that record on the map.
Clicking on View shows more details about the weed record.
[Actions: Click View on an individual record]
[Visuals: Weed Record page is shown]
You can also find out more about the weed species by clicking on the species name.
[Actions: Click on species name]
[Visuals: Species page is shown]
[Visuals: Menu bar including Species, Places and Search is shown]
And finally, SWAT lets you browse Species and Places, and provides a handy Search facility.
Closing
Thanks for watching!
We hope you found this useful to get you started with SWAT.
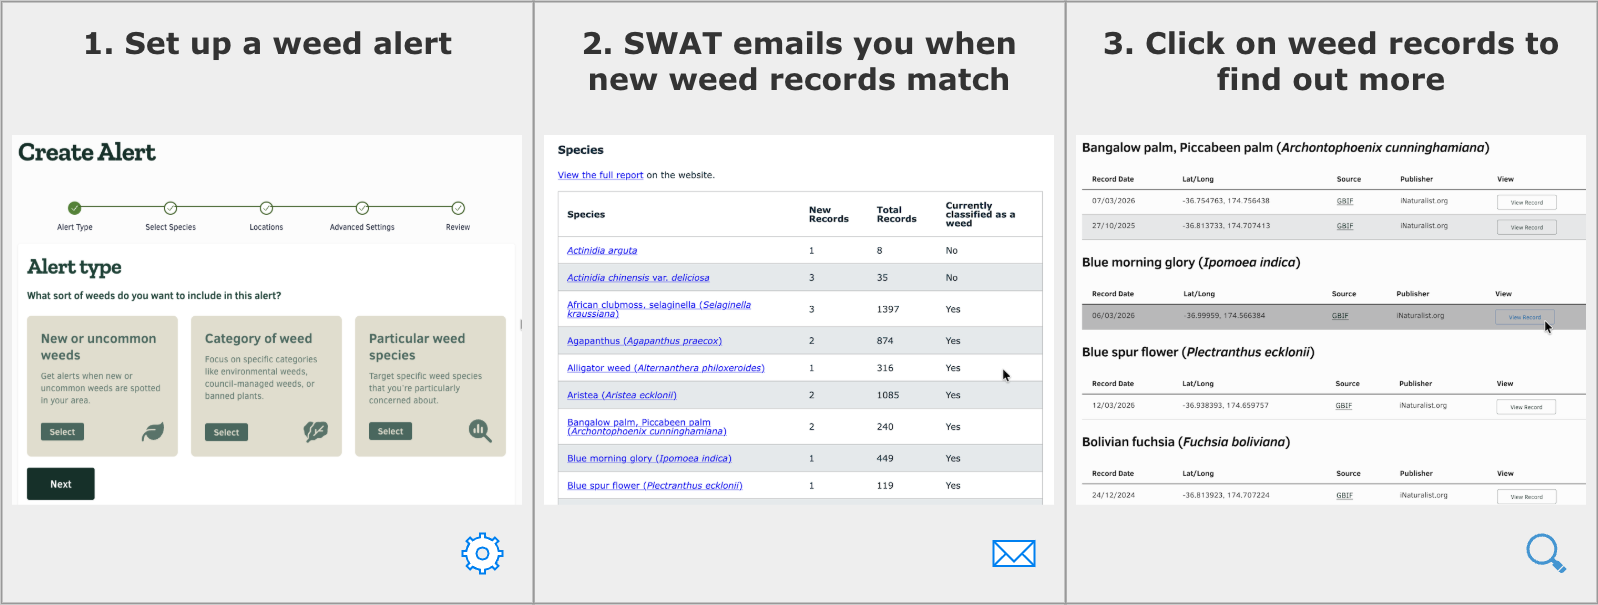
SWAT is a free tool that emails you when new weed records appear in New Zealand. It’s for anyone, including keen locals, conservation volunteers, researchers and people who manage weeds for an organisation.
As a SWAT user, you create personalised alerts for the weeds and places you care about. SWAT scans new weed records uploaded to the Global Biodiversity Information Facility (GBIF). These records come from sources such as iNaturalist, government and regional agencies, herbaria and other contributors. When a new record matches your alert settings, SWAT emails you.
Each alert email includes links to the weed records. You can see their locations and find out more about each species.
Alert process at a glance
Follow the diagram to set up a SWAT alert.
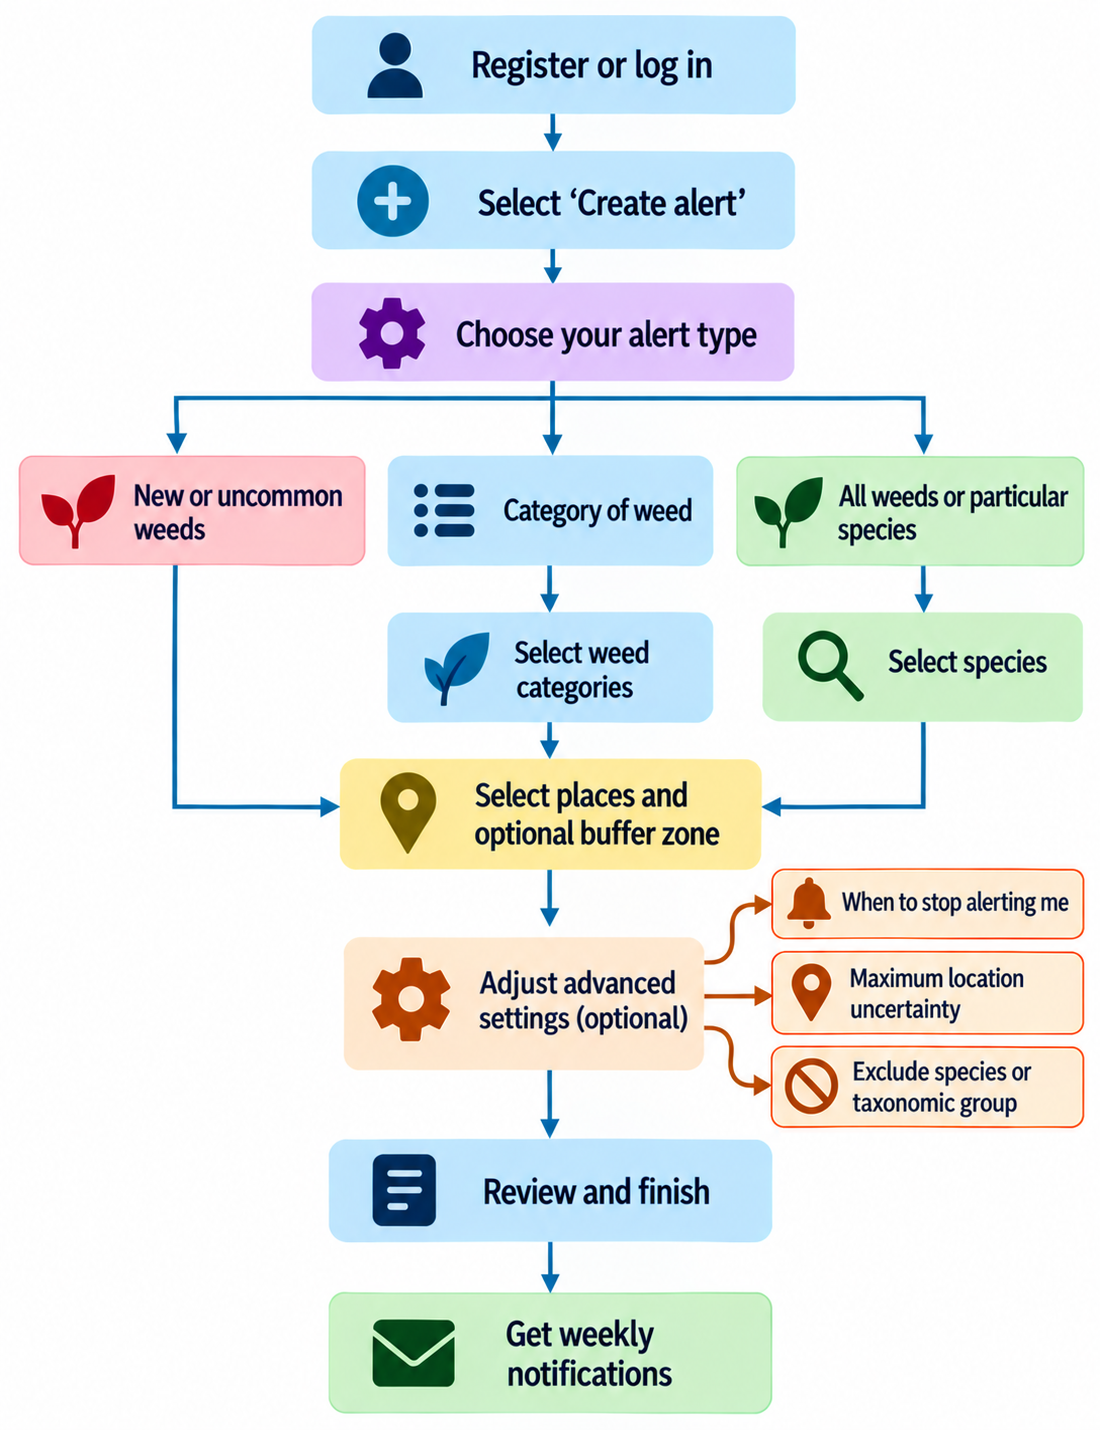
After you create an alert, you get weekly notifications when new weed records match your settings.
For more details, read about setting up a weed alert or getting notifications of new weed records.